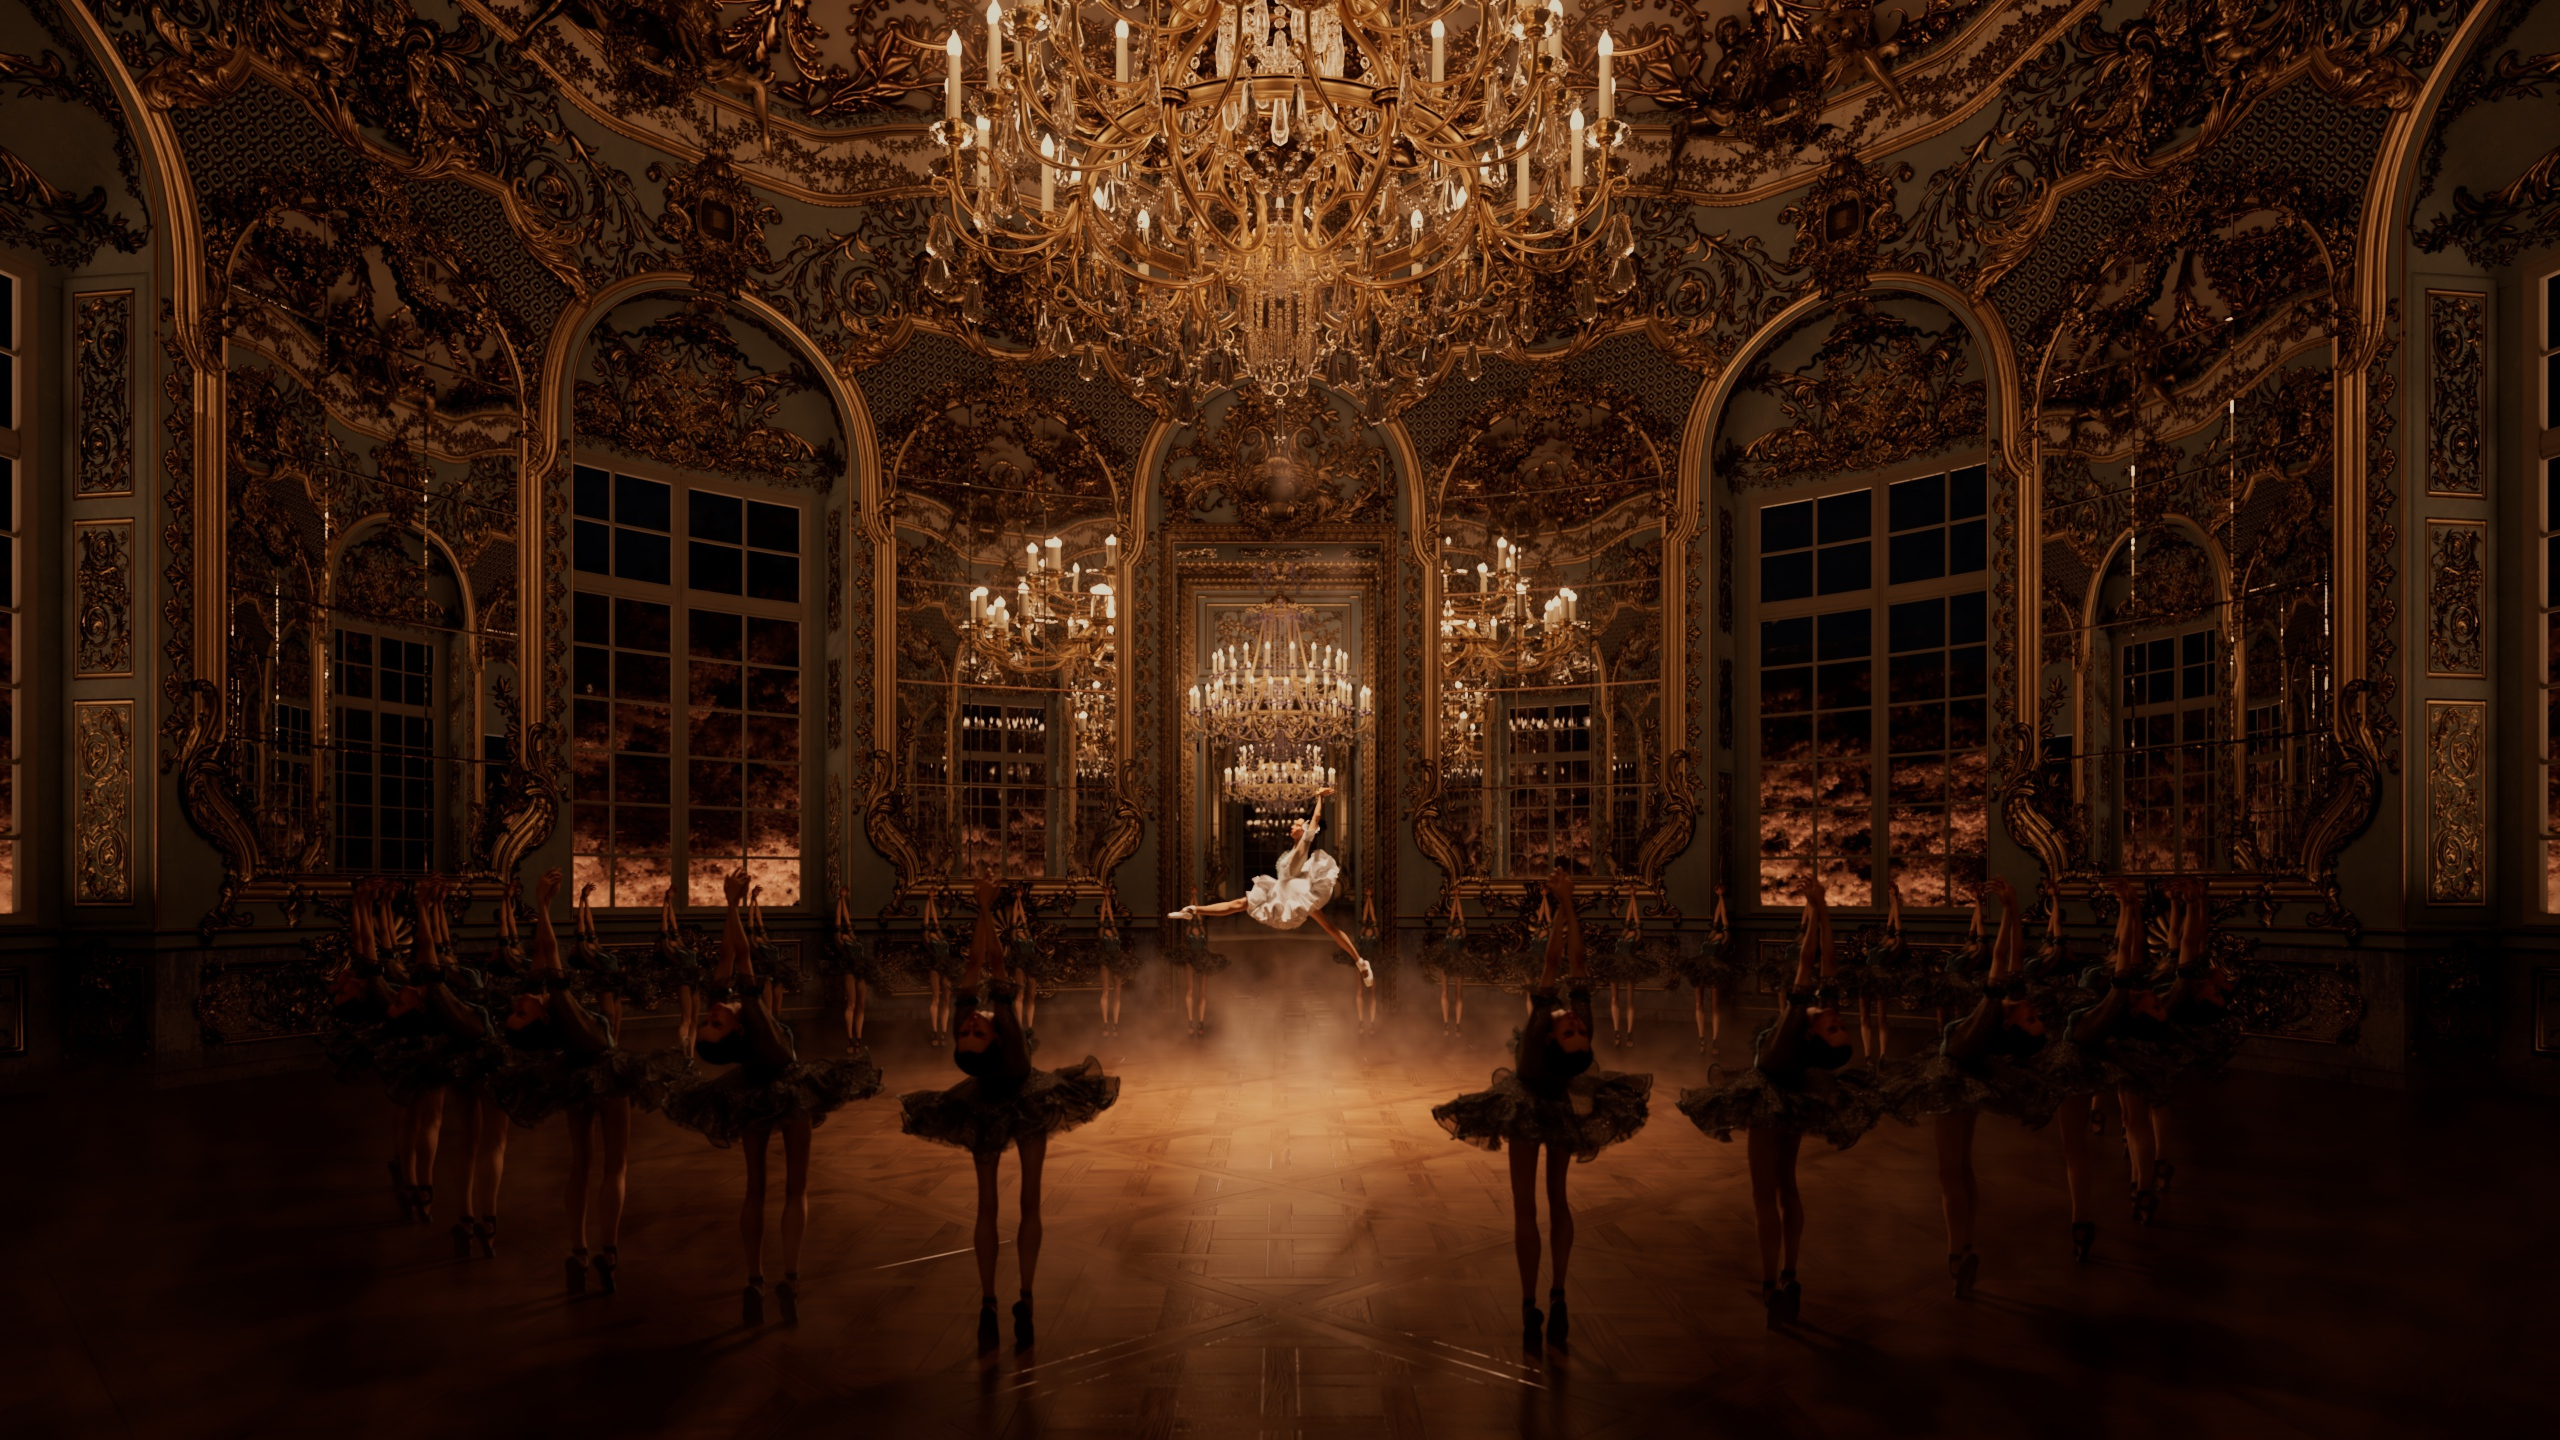
Project “Ballerina” is a 30-second full CG animation, Kay John Yim’s first personal project to full-length an turned-on photorealistic CG weft staged within a grand Baroque rotunda lounge. The lead hoofer is mainly made with Weft Creator, turned-on in iClone, and rendered with Redshift and Cinema4D.

Kay John Yim is a Chartered Technie at Spink Partners based in London. He has worked on a wide range of projects wideness the UK, Hong Kong, Saudi Arabia and Qatar, including property minutiae and landscape design. His work has been featured on Maxon, Artstation, CG Record and 80.LV.
Yim’s growing passion for crafting unbuilt tracery with technology has gradually driven himself to taking on the role of a CGI artist, delivering visuals that not only serve as vendee presentations but moreover as ways of liaison among the diamond and construction team. Since the 2021 COVID lockdown, he challenged himself to take courses in CG disciplines vastitude architecture, and has since won increasingly than a dozen CG competitions.
This making-of tutorial vendible is a short version of “Ballerina: A CGI Fantasy”, written by Kay John Yim. For the full version, please visit Fox Renderfarm News Center.
The Making of Ballerina
The volatility is a representation of my inner struggles in all originative pursuits, both metaphorically and literally.
Ballet, an art form widely known to have stringent standards of eyeful and highly susceptible to public and self-criticism, is the metaphor of my daily professional and originative practice. As an technie by day, I work on architectural visualizations, where every detail is stuff scrutinized by my colleagues, senior architects and clients. As an versifier by night, I work on personal CG projects, of which I would do hundreds and up to thousands of iterations to get the perfect compositions and verisimilitude schemes. No matter how proficient I wilt in my professional and originative skills, the inner struggle never fades away.
Through months of trial and error, I have since learned a lot well-nigh efficient weft volatility and rendering. This vendible is an intermediate guide for any indie artists like myself who want to take their CG art to the next level.
The guide is divided into 4 main parts:
- The Architecture
- The Character
- The Animation
- Rendering
Software I used include:
- Rhino
- Moment of Inspiration 4 (MOI)
- Cinema4D (C4D)
- Redshift (RS)
- Character Creator 3 (CC3)
- iClone
- ZBrush & ZWrap
- XNormal
- Marvelous Designer 11 (MD)
- Houdini
1. THE ARCHITECTURE
My primary software for architectural modeling is Rhino.
There are many variegated ways to tideway architectural modeling. Rhino’s main wholesomeness over some other increasingly popular DCCs like Cinema4D (C4D) or Houdini is its sufficiency in handling very detailed curves in large quantities.
As an Architect, every model I built unchangingly started with a curve, usually in the shape of a wall section, cornice or skirting section, swept withal flipside lines of a plan. Rhino’s writ list might seem overwhelming at first, but I scrutinizingly exclusively used a dozen of them to turn curves into 3D geometry:
- Rebuild
- Trim
- Blend
- Sweep
- Extrude
- Sweep 2 Rails
- Flow Withal Surface
- Surface from Network of Curves
The key to architectural modeling is to unchangingly use reference wherever possible. I unchangingly have PureRef unshut at the right marrow corner of my screen to make sure I model in correct proportions and scale. This usually includes very photos and architectural drawings.
For this particular project I used the Amalienburg Hunting Lounge in Munich as my primary reference for the architecture.

While the tracery consisted of 3 parts – the rotunda, the hallway and the end wall – they were substantially the same module. Hence I initially modeled one wall module consisting of a mirror and a window, duplicated and wilting withal a whirligig to get the walls of the rotunda.


The module was reused for both the hallway and the end wall to save time and (rendering) memory. Having built up a library of architectural profiles and ornaments over the past year, I was worldly-wise to reuse and recycle profiles and ornaments for the modeling of the architecture.
Ornament modeling could be a daunting task, but with a couple of ornaments modeled I simply duplicated and rearranged them geometrically to get unique shapes.
All the objects within Rhino were then prescribed to variegated layers by material; this made material work a lot easier later on in C4D.
Note :
The weightier way to get familiar with Rhino navigation is to model small-scale objects. Simply Rhino has a unconfined beginner’s series in modeling a teapot in Rhino: For anyone in a pinch, there are pre-built ornaments for purchase on 3D model stores like Textures.com ; some ornament manufactures have self-ruling models misogynist for download on Sketchfab and 3dsky.
Exporting from Rhino to C4D
Rhino is primarily a NURBS (Non-Uniform Rational B-Splines) software; and although NURBS models are very well-judged in representing lines and surface data, most render engines or DCCs do not support NURBS.
For this reason I exported the NURBS and MESHES to .3dm and .FBX respectively, and used Moment of Inspiration (MOI) to convert the NURBS model to a mesh.
MOI has the weightier NURBS to quad mesh conversion(over Rhino or any other DCCs) – it unchangingly gives a wipe mesh that could then be hands edited or UV-mapped for rendering.

Importing into C4D
Importing the FBX file into C4D was relatively straightforward, but there were a couple of things I paid sustentation to, notably the import settings, the model orientation and file unit, listed unelevated in order of operation:
- open up a new project in C4D (project unit in cm);
- merge FBX;
- check “Geometry” and “Material” in the merge panel;
- change imported geometry orientation (P) by -90 stratum in the Y-axis;
- use script “AT Group All Materials” to automatically organize Rhino materials into variegated groups.


I modeled half of the tracery in Rhino and then mirrored it as an instance in C4D, since everything is symmetrical.

The floor (Versailles Parquet tiles) was modeled using photo-texturing method, most widely touted by CG versifier Ian Hubert. I unromantic a Versailles Parquet tile photo as texture on a plane, then sliced up the plane with a “knife” tool to get the reflection roughness variations withal the tile grouts. This unliable me to add subtle verisimilitude and dirt variations with Curvature in Redshift.
The floor tile was then placed under a Cloner to be duplicated and spanned over the unshortened floor.

Note :
C4D and Rhino use variegated Y and Z orientations, hence FBX directly exported from Rhino has to be rotated in C4D.
Architectural Shading (Cinema4D Redshift)
Since I grouped all the meshes by materials in advance, assigning materials was just as simple as dragging and dropping to the material groups as cubic maps or Tri-planar maps. I used Textures.com, Greyscalegorilla’s EMC material pack and Quixel Megascans as wiring materials for all my shaders.
For ACES to work correctly within Redshift, every texture has to be manually prescribed to the correct verisimilitude space in the RS Texture Node; often diffuse/albedo maps vest to “sRGB”, and the rest (roughness, displacement, normal maps) vest to “Raw”. My architectural shaders were mostly a 50/50 mix of photo texture and “dirt” texture to requite an uneaten hint of realism.
2. THE CHARACTER
The wiring weft was created in Weft Creator 3 (CC3) with Ultimate Morphs and SkinGen plugins – both of which were very versifier friendly with self-explanatory parameters.
Ultimate Morphs provided precise slider controls to every unorthodoxy and muscle size of the character, while SkinGen gave a wide range of presets for skin color, skin texture detail and makeup. I moreover used CC3’s Hair Builder to wield a game-ready hair mesh to my character.
Face Texturing
Face was the one of the most important parts of the CG weft that required uneaten attention. The weightier workflow I found to add photorealistic detail was the “Killer workflow” using Texturing XYZ’s VFace model and Zwrap.
VFACE is a hodgepodge of state-of-the-art photogrammetry human throne models produced by Texturing XYZ; every VFACE comes with 16K of photoscanned skin textures, ostracism and utility maps; Zwrap is a ZBrush plugin that allows one to automatically fit a pre-existing topology to a custom model.
The “Killer workflow” substantially matches the VFACE mesh shape to the CC3 throne model; using the Killer workflow, I was worldly-wise to torch all the VFACE details lanugo to the CC3 throne model once the 2 mesh shapes are matched up.
My version of the “Killer workflow” can be wrenched lanugo as follow:
- export T-posed weft from CC3 to C4D;
- delete all polygons except the throne of the CC3 character;
- export both CC3 throne model and VFACE model to ZBrush;
- use MOVE/Smooth skim to maneuverer VFACE model to fit as closely as possible to the CC3 throne model;
- launch ZWRAP, click and match as many points as possible, notably virtually the nose, eyes, mouth and ears;
- let ZWRAP process the matched up points;
- ZWRARP should then be worldly-wise to output a VFACE model that matches perfectly to the CC3 throne model;
- feed both models into XNormal and torch the VFACE textures to the CC3 throne model.
Note :
Full “Killer Workflow” Tutorial on Textureing.XYZ’s official Youtube channel: VFace – Getting started with Amy Ash. I recommend saving the matching points in ZWRAP surpassing processing. I moreover recommend sultry all the VFACE maps individually in XNormal as they are very high-res and could crash XNormal when baked in batch.
Skin Shading (Cinema4D Redshift)
Once I had the XYZ texture maps ready, I then exported the rest of the weft texture maps from CC3. After that, I imported the weft into C4D, and converted all the materials to Redshift materials.
At the time of writing, Redshift unfortunately did not yet support Randomwalk SSS (a very realistic and physically well-judged subsurface spattering model found in other renderers like Arnold), hence required a lot increasingly tweaking when it came to rendering skin.
The 3 levels of subsurface spattering were driven by a single longish material with variegated “Color Correct” settings. The throne shader was a mix of both the CC3 textures and VFACE textures; the VFACE multichannel ostracism was composite with the “microskin” CC3 displacements map.
A “Redshift Object” was unromantic to the weft to enable ostracism – only then would the VFACE displacements show up in render.

Hair Shading
Having experimented with grooming using C4D Ornatrix, Maya Xgen and Houdini, I decided that using the baked hair mesh from CC3 for project “Ballerina” was leaps and premises increasingly efficient lanugo the line. I use a Redshift “glass” material with CC3 hair textures maps fed into the “reflection” and “refraction” verisimilitude slots, as hair (in real life) reacts to light like tiny glass tubes.
Note :
For anyone interested in taking the CC3 hair to the next level of realism, CGcircuit has a unconfined vellum tutorial defended to hair generation and simulation.

3. THE ANIMATION
Character Volatility : iClone
I then exported the CC3 Character to iClone for animation. I considered a couple of ways to tideway realistic weft animation, these included:
- using off-the-shelf mocap data (Mixamo, Reallusion ActorCore);
- comissioning a mocap studio to do bespoke mocap animation;
- using a mocap suit (e.g. Rokoko or Xsens) for custom mocap animation;
- old-school keyframing.
Having experimented with various off-the-shelf mocap data, I found Mixamo mocaps to be way too generic, most of which squint very robotic; Reallusion Actorcore had some very realistic motions, but I could not find exactly what I needed for the project. With no upkeep and (my) very specific weft motion requirements, option 2 and 3 were out of the picture. This led me to old-school keyframing.
First I screen-captured videos of ballet performances and laid them out frame by frame in PureRef. I then overlaid the PureRef reference (in half opacity) over iClone, and adjusted every weft joint to match my reference using “Edit Motion Layer”.


The turned-on notation were then exported to Alembic files.

Note :
While my final project concept depicted ballerinas in slow motion, my original idea was unquestionably to keyframe a 20-second ballet dance, which I very quickly realized to be bad idea for a number of reasons:
- in slow motion a lot of frames could be interpolated, but real time motion involved a lot of unique frames and hence required a lot increasingly tweaking;
- subsequently increasingly unique frames meant increasingly rendering problems (flickering, tessellation issues etc.).
Considering this as my first weft volatility project, I came to the conclusion of doing a slow-motion style sequence instead – 2 unique poses with 160 frames of motion each.
Garment Simulation
Cloth simulation was by far the most challenging part of the project. The two major reticulum simulation/solvers that I considered were Marvelous Designer (MD) and Houdini Vellum.
While Houdini Vellum was much increasingly versatile and increasingly reliable than Marvelous Designer, I personally found it to be way too slow and therefore impractical without a sublet (one frame of reticulum simulation could take up to 3 minutes in Houdini Vellum vs. 30 seconds in Marvelous Designer on a Threadripper PRO 3955WX with 128GBs ram).
Cloth simulation in MD, while often a lot quicker to setup than Houdini vellum, was not as straightforward as I imagined. Simulated garments in MD unchangingly came with some form of glitches; this included reticulum jittering, piercing through weft or just well-constructed dislocations. Unelevated are some of the settings I tweaked to minimize glitches:
- using “Tack” to nail parts of the garment to the character;
- increasing reticulum “Density” and “Air Damping” to prevent garment from moving too fast and subsequently move out of place;
- simulate parts of the garment in isolation – though not physically accurate, unliable me to iterate and debug a lot quicker.
I moreover reduced “Gravity” in wing to the whilom tweaks to unzip a slow-motion look.
Note :
The official Marvelous Designer Youtube waterworks has a lot of garment modeling livestreams which I find to be the most helpful resource for learning MD. Alternatively there are a lot of readily misogynist 3D garment online (notably on Marvelous Designer’s official site or Artstation Marketplace) which I used as a understructure for a lot of my projects.
MD is extremely prone to crashing, there is moreover a bug in both MD10 and MD11 that prevents saving of simulated garments 90% of the time, so unchangingly export simulated garment as Stein files rather than relying on MD to save the simulation.
Simulation Clean-up
After dozens of simulations, I would then import the MD exported Stein files into Houdini, where I did a lot of transmission cleanups, this included:
- manually fixing collided reticulum and weft with “Soft Transform”;
- reducing simulation glitches with “Attribute Blur”;
- blending together preferable simulations from variegated stein files with “Time Blend”.
The cleaned-up reticulum simulation was then exported as Stein to C4D.
Alternative to Garment Simulation
For anyone frustrated by the impractical Houdini Vellum reticulum simulation times and MD glitches, an volitional would be to literally nail the garment to the character’s skin in CC3 – a technique most wontedly found in game production.
Note :
See the Reallusion’s official guide for creating game-ready garments here.
Garment Sultry and Shading
Once I was washed-up with reticulum simulation in MD and clean-up in Houdini, I imported the Stein file into C4D. MD Stein files unchangingly show up in C4D as one stein object without any selection sets; this makes material assigning impossible.
This was where C4D sultry came to play – a process I used for converting the Stein file into C4D object with PLA (Point Level Animation):
- drag the stein object into C4D timeline;
- go to “Functions”;
- “Bake Objects”;
- check “PLA”;
- then bake.
Going through the steps whilom I was worldly-wise to get a baked lanugo C4D object that I could hands select polygons and assign multiple materials using selection sets. I then exported an OBJ file from MD with materials, imported into C4D and dragged the selection sets directly onto the baked lanugo garment object. This eliminated the need to manually reassign materials in C4D.
I used a tousle of linen texture maps (from Quixel Megascans Bridge) and Redshift Car Shader to emulate sequins fabric (think “blink”) found in a lot of professional ballet tutu dresses.

WARNING :
Do not use AO or Curvature nodes for the simulated garment materials (or any turned-on object), as they could potentially produce glitches in final renders.
4. RENDERING
Lighting & Environment
Although I tried to alimony my lighting as minimal as possible, project “Ballerina” inevitably required a lot of tinkering due to the nighttime setting.
The nighttime HDRI did not provide sufficient ambient light to the interior space, and the chandelier bulbs were way too dim as the primary light source. Ultimately I placed an invisible spot light under the part-way chandelier and used a fake spot light that only unauthentic all the architectural ornaments. The fake light provided an uneaten level of vellicate light that gave just the right value of illumination without ruining the moody atmosphere.
I moreover widow a “Redshift Environment” controlled in Z turning multiplied with “Maxon Noise” to requite increasingly depth to the scene. Exterior-wise, I scattered 2 variations of Dogwood Trees with C4D “Matrix” in the surrounding area. They were lit from ground up in the scene to requite uneaten depth. In summary lighting of the scene includes:
- Dome light (nighttime HDRI) x 1
- chandelier (mesh lights) x 3
- Spot Light (center) x 1
- exterior Zone Lights x 4
- fake Zone Light positioned under chandelier (includes architectural ornaments only)
Note :
The trees were generated with SpeedTree. Lighting takes a lot of resulting practice to master; untied from my daily CG practice, I spent a lot of time watching b-rolls/breakdowns of movies – for instance I took a lot of inspiration from Roger Deakin‘s lighting and cinematography, as well as Wes Anderson‘s frame sonnet and verisimilitude combinations.
Camera Movements
All my camera movements were very subtle. This included dolly, camera roll and panning shots, all driven with Greyscalegorilla’s C4D plugin Signal. I personally prefer using Signal for its non-destructive nature, but old-school key-framing would work just fine for similar camera movements.
Draft Renders
Once I had the weft animations, reticulum simulations and camera movements ready, I began to do low-res test renders to make sure that I would not get any surprises during the final renders, this included:
- flipbook (openGL) renders to ensure the timing of the animations were optimal;
- low-res low-sample full sequence renders to ensure there were no glitches;
- full-res (2K) high-sample still renders with AOVs (diffuse, reflection, refraction, volume) to trammels what unsalaried to the prevalent noise if any;
- submitting test render to Fox Renderfarm to ensure the final renders matched up with my local renders.
This process lasted over 2 months with iterations and iterations of renders and corrections.


Final Renders & Denoising
I used a relatively high-sample render setting for the final renders, as interior scenes in Redshift were often prone to noise.

I moreover had motion blur and bokeh turned on for the final renders – in unstipulated motion blurs and bokehs squint largest (more physically accurate) in-render compared to motion blurs and bokehs widow via compositing.
Half of the final 2K sequence was rendered on a local workstation, while the rest was rendered on Fox Renderfarm, total in well-nigh 6840 hours of render time on dual RTX 3090 machines. I used Neat Video for denoising the final shot, whereas the closeup shots were denoised using Single Altus (in Redshift).
Note :
Always turn “Random Noise Pattern” off under Redshift “Unified Sampling” when using “Altus Single” for denoising.
Redshift Rendering GI Trick
Redshift’s GI Irradiance Enshroud numbering could be quite costly; my final renders for instance have an stereotype of 5 minutes of GI Irradiance Caching time for each frame.
In Vray there was an option in the IR/LC setting named “use camera path”, designed specifically for scenes where the camera would move through a still scene. Once “use camera path” was enabled Vray would then only summate one frame of GI enshroud for an unshortened sequence. Borrowing a page from Vray, I use the pursuit motion mistiness settings to summate the first frame of Irradiance Cache:

The one Irradiance Enshroud is then used to render the unshortened sequence. Two shots of the project were rendered using one single GI cache, resulting in a 10% faster render time overall.
Note :
The GI trick only applies to shots with very little motion; when unromantic to the 2 closeup shots of project “Ballerina” for example, I got light patches and ghosting on the character skin.

Conclusion
Having spent months working on the project, I have gained an appreciation for traditional weft animators – I never realized the value of effort involved in crafting weft animations, and the subtlety of details required to bring inveigling CG notation to live.
Though I would not consider myself to be a weft artist, I personally think Character Animations are really powerful in making CG environments relatable, and therefore would still be an essential part of my personal CG pursuit moving forward.
Learn more :
• Kay John Yim’s personal site https://johnyim.com/
• Kay John Yim’s ArtStation https://www.artstation.com/johnyim
• Weft Creator https://www.reallusion.com/character-creator/download.html
• iClone https://www.reallusion.com/iclone/download.html
• Reallusion https://www.reallusion.com/
這篇文章 <strong>Ballerina: One Architect’s CGI Fantasy made with Cinema 4D, Weft Creator and iClone</strong> 最早出現於 Reallusion Magazine。


.jpg)